The Jimmy Possum Chair · A Field Guide
An antique Upside Down Armrest stick chair against a deep navy museum wall on a honey-toned wood floor.

A Step-by-Step Guide

The Jimmy Possum Chair

JP Build Guide, start to finish.

Upside Down Armrest Chair, c.1900 (exhibit 13), QVMAG, Launceston, Tasmania. Photo: Lewis Laskin, 2022.

Scroll to begin

Bench mode: condensed steps only — story, gallery and sources are hidden. Switch to Story for the full guide.

Please Read First

Before You Begin

Jimmy Possum chairmaking is a living folk tradition in Tasmania. I do not have any firsthand training or insights from the families who have passed this form down through the generations. This guide describes how I teach the JP chair in the United States — the opposite side of the world from where the living tradition continues today. There are many ways to make any chair, and I plan to add other JP chairmaking methods in future iterations of this site.

I also used an AI agent in the creation of this website — though that's not to say the words and processes aren't my own. AI helped flesh out some of my shorthand into full sentences, which I then edited. It helped me build the website, which I then edited. And it generated some of the crude drawings from my descriptions, which we then iterated together into something accurate and educational.

Working safely
This is hand-tool work, but it is not soft work. Wear eye protection whenever you strike steel on steel — a sledge on a wedge can throw chips. Keep your wedge heads dressed: grind off the mushroomed rim before it can shed a splinter of steel. With the drawknife, keep both hands on the handles, take strokes you can stop, and remember the blade travels toward you — let the shavehorse hold the work, not your free hand. If you take up the adze, set your feet so a missed blow lands in wood or air, never in shin. And when a log is being split or rolled, everyone who isn't swinging stands clear.
Use & rights
This guide is free and made for educational purposes only. The text, diagrams, and photographs are © Lewis Laskin except where noted; quoted passages and archival images remain © their respective owners, all credited in the Sources and reproduced here for education and commentary. Please don't redistribute it or monetize it in any way.

The Story

A Chair from the Backwoods

This guide will teach you to build a Jimmy Possum chair — a folk armchair born in the bush of northern Tasmania in the late nineteenth century. You will start with a log, not a board: split it with wedges, rive it into parts with a froe, and shave those parts to shape at the shavehorse with a drawknife. The tools are few and old. The wood is green. With luck and patience, the result is a chair you could hand down for a century.

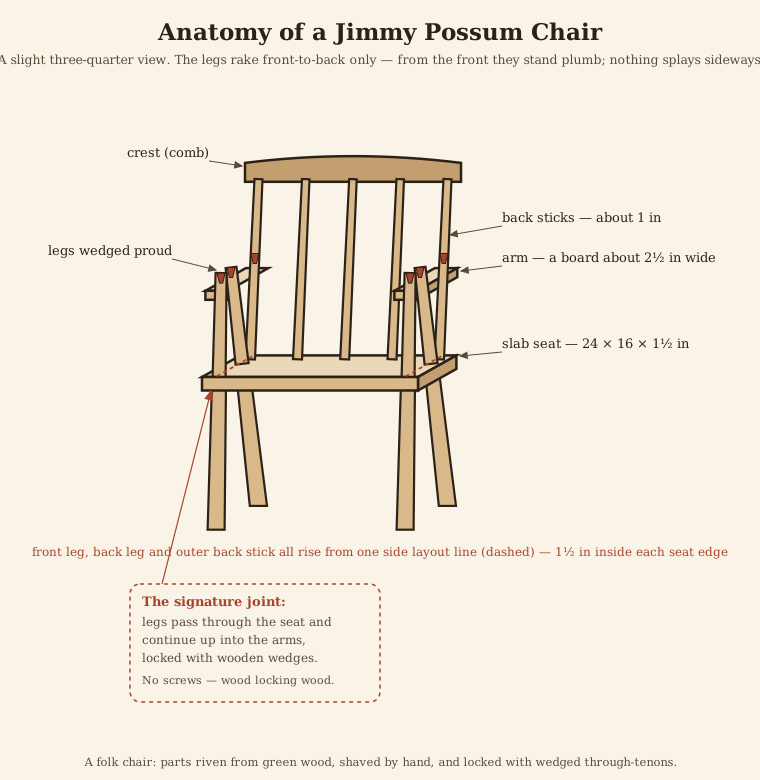
Labeled diagram of the chair: crest (comb) on top, back sticks, arms, slab seat, and legs — the legs pass through the seat and continue up into the arms, wedged proud.
The parts of the chair: crest (comb), back sticks, arms, slab seat, and legs. The signature joint — legs passing through the seat and on into the arms, locked with wedges — is what makes a Jimmy Possum a Jimmy Possum.

Who was Jimmy Possum?

Nobody is quite sure. The name belongs both to a kind of chair and to a half-legendary maker who worked the Deloraine district of Tasmania around the turn of the twentieth century. The most careful account we have comes from a 1978 catalogue produced by students at the Tasmanian School of Art, who spent five months tracking down surviving chairs and the stories attached to them. They were frank about how little is certain:

After considerable research, the identity of Jimmy Possum remains an enigma. Although often talked about and referred to, he persists as a shadowy figure; his name, age and background as yet unconfirmed.

“Chairs made by Bush Carpenters in Tasmania,” Tasmanian School of Art, 1978

The legend itself is the catalogue's to tell. Its informants describe “an old man with a long white beard” living around Deloraine, Chudleigh, or Mole Creek from the 1890s until about 1910. He was said to live in, or against, a hollow tree. There he made his chairs, “often painted green or grey,” and sold them for two shillings and sixpence. The catalogue also records other makers of the district copying and adapting the style, so “Jimmy Possum” may have been less one man than a name that gathered up the work of several.

What is not in doubt is the chair. Its defining feature is structural and unmistakable, and the catalogue describes it plainly in an entry for a solid blackwood example:

The legs protrude through the slab seat to support the arms and are secured with wooden wedges.

Tasmanian School of Art catalogue, 1978
Scanned catalogue page: two stick-back chairs photographed side by side.
A pair of stick-back chairs attributed to Jimmy Possum — the legs pass through the seat and carry on into the arms. Catalogue page © 1978 Tasmanian School of Art; photographer uncredited; reproduced at reduced size for education and commentary.

An unbroken tradition of the Meander Valley

Decades after that first catalogue, the chairs got the exhibition they deserved. In 2022 the Queen Victoria Museum & Art Gallery in Launceston mounted “Jimmy Possum: An Unbroken Tradition,” gathering more than fifty of the best examples from the 1870s to the 2010s. The photographs of antique chairs in this guide are mine, taken at that show. Its wall text frames the tradition better than I can:

The Jimmy Possum chair-making tradition is like no other in the country, as it is bound to a small region of northern Tasmania, where the people of the Meander Valley started and continued the tradition.

Queen Victoria Museum & Art Gallery, “Jimmy Possum: An Unbroken Tradition,” 2022

The exhibition charted the makers who came after Jimmy Possum — an unbroken line, as its title says, of more than 150 years.

A small chair in worn green house paint, on a museum platform.
The Small Greenhill Chair (exhibit 2) by George Greenhill, in reclaimed timber and house paint — the same green the bush carpenters favored. Photo: Lewis Laskin, QVMAG, Launceston, 2022.

Much of what we now know comes from Dr. Mike Epworth, who first encountered the tradition in the 1990s and, with research partner Bronwyn Harm, has done the most to document it. The exhibition traces the chair through the maker families of the Meander Valley — the Larcombes, Michael Cook, the McMahons, the Cubits, the Kings — and back to a man named George Greenhill.

Greenhill (1850–1937) of Westbury made some of the earliest documented chairs in the style at his property, Egmont. One of the loveliest objects in the show is his 1886 farm journal, open to a single line:

Wet day, made chair for wife, white sow had eight pigs.

George Greenhill, farm journal, 1886 (QVMAG exhibition)

The curators believe that entry records the making of his famous Six-legged Chair. Distracted, perhaps, by the new wife and the eight piglets, Greenhill fitted the back rungs to the front of the seat instead of the rear, then added extra legs to make the off-balance chair stand. It is a perfect little portrait of folk furniture: a working man, a rainy day, a mistake cheerfully remedied. Carry that spirit to your own bench.

A folk chair, like the backwoods chairs of Appalachia

It helps to see the Jimmy Possum not as an oddity but as Tasmania's version of something that appears wherever people make their own furniture from the trees around them. In the southern Appalachian mountains of the United States, the same impulse produced the post-and-rung “settin' chair,” a tradition Andrew Glenn documents in Backwoods Chairmakers. The parallels are striking. Glenn found that the chair went by many names and resisted a single one:

I heard the chair called a split bottom, common chair, mule ear, settin' chair, ladderback, hickory bottom, woven chair or mountain chair. Or, as one maker put it, “It's simply a chair.”

Andrew D. Glenn, Backwoods Chairmakers (Lost Art Press, 2023)

The Tasmanian researchers had the same trouble naming theirs. They ran through “cottage, country, bush, amateur, hand-made, primitive, rustic, kitchen” before allowing, a little reluctantly, that “primitive” was the term that “most correctly defined the methods and circumstances of their production.” Both traditions describe chairs that are, in the catalogue's words, “essentially one-off pieces, often crudely wrought, generally independent of most traditional designs, and originating in rural rather than urban areas. The maker's approach is unpretentious, the style unsophisticated and any innovations may be the result of circumstance rather than formal training.”

Both traditions also lean on what Glenn calls a simple trick: a moisture difference between the two parts of a joint. The piece with the hole, the mortise, goes together wetter than the tenon. As the parts reach equilibrium the hole shrinks and the tenon swells, tightening the joint. Do it the other way around and you get the opposite result: a wet tenon shrinks away from the hole as it dries, and the joint goes loose.

And in both places the chair is more than an object. Glenn writes that for some makers the chairs “represent an identity and a way of life,” and that “each chair is both an expression and a representation of the maker.” The Tasmanian bush carpenters left no such testimony, only the chairs. But the chairs say much the same thing. When you build yours, you join that line.

Why we work this way
Splitting and shaving green wood is not nostalgia — it is the efficient way to get strong, light parts with hand tools. Why riven wood is stronger, and how to read it, is the subject of the next chapter, “The Wood, and How to Read It.”

What you are about to do

The build runs in a logical arc, and this guide follows it section by section. You will split the log and rive your parts (Section 1), shave them to shape (2), and take each part to four-square, taper, and octagon before setting it all aside to dry (2b). Then you lay out the seat (3) and build the chair in your hands: drill the outer back sticks through seat and arm together (4), fit the back sticks and legs (5), drill the arm for each leg (6), fit the remaining sticks and the comb (7), bring every part to its finished shape (8), assemble and level (9), and pin and wedge (10). If you like, saddle the seat for comfort (Extras).

A word on this chair's joinery
Unlike chairs made to plans — often shaved, drilled, and cut to prescribed dimensions and angles — a folk chair's dimensions evolve as you go. A JP chair's legs rake (lean front to back) but do not splay (lean out to the side), so every hole's angle is read along a single layout line, not a compound resultant. Rather than drilling a seat to a set of numbers, you fit each part to the chair as it grows, reading the angles off the work itself. It is a folk method: forgiving, adaptable, and very much in the spirit of the bush carpenters who invented it.

This guide teaches one standard way to build the chair, using ideal materials and clean, predictable choices at each step. Where the old chairs did something different, you'll find a Historic JP variation note; where the folk tradition invites you to make do with what you have, you'll find a Folk approach note. Take or leave them as you like. There are many ways to build this chair — this is just one. A companion Workshop Manual condenses all of this to scannable cards for use at the bench.


The Story

The Wood, and How to Read It

A chair is only as good as the log it comes from. The standard build starts with one clear, straight-grained green oak log, the most workable stock there is, and rives nearly every part from it. Here is what to look for and why.

Why green wood

Freshly felled “green” wood is full of moisture, which makes it easier to split and shape with hand tools. A lot of the cost of lumber is the processing and drying, so logs cost far less, board foot for board foot. You also get to use wood with a story: species that aren't sold commercially, a tree from a family home, something rustic with bug holes.

Caution
Because green parts shrink as they dry, you must split them out larger than your final desired size. Add ⅛″ to the thickness and width of green parts. Don't use a green seat — a wide green slab will check and split as it dries.

Riving and the radial face

Splitting and shaving green wood is not nostalgia. Riven parts follow the wood's long fibers unbroken, which makes them far stronger and lighter than sawn parts — and far easier to shape by hand. As Jennie Alexander put it, you rive “to easily and readily obtain powerful bundles of long fibers.” Riving works radially: you split the log in half through the pith, then into quarters and finer, each split running pith-to-bark along the rays, so each part comes off the log with a true radial face already on it. On a big log you'll split well past quarters; once the pieces get small you'll also split tangentially, along the rings, just to get down to size. More on that in Section 1.

A log end split in stages: whole, halved through the pith, quartered, then riven into billets along the rays.
Rive radially — halve through the pith, quarter, then split billets along the rays. Shave the way the grain lies, like petting a cat.

Reading the grain: radial and tangential

Look at the end of a log and you see growth rings circling the pith, with faint radial lines — the medullary rays — running outward like spokes. These two directions give a part its two kinds of face. A radial face lies along a ray, square to the rings, and its grain reads as straight parallel lines. A tangential face lies across the rings, and its grain reads as nested “cathedral” arches.

A log end with growth rings and rays, and a riven billet showing its radial face with straight grain lines and its tangential face with cathedral arches.
Radial faces read as straight lines; tangential faces read as “cathedrals.”

For the standard chair, orient the wide faces of the arms and crest radial — the broad 2½″ face of an arm lying on the ray. Radial faces are more stable, move less, and present cleaner grain to the eye. Alexander's instruction for every part is simply to start with the radial face and work from there. The legs and back sticks, being roughly square, end up with a radial face on two sides and tangential on the other two.

Choosing the log

For the standard build, seek clear, straight-grained oak with no knots, twist, or rot in the lengths you need — it is the most predictable to read and the easiest to work. As Glenn notes, “straight-grained material works easier with hand tools.” One good log holds an entire chair.

Historic JP variation
Surviving Jimmy Possum chairs were rarely made from picture-perfect stock. The Tasmanian makers used whatever wide timber was on hand — blackwood, myrtle, even recycled boards from packing cases for the seats — and many show an off-center pith or a bit of character. The chair tolerates it.
The folk approach
Ideal is not required. Irregular, figured, or even knotted wood is harder to split and shave, but it can make a really interesting chair — and as long as you split and shave along the undulating fibers, the result is unique and just as strong as a straight-grained one. Bug holes, an off-center pith, a little twist, a rustic streak: all welcome, all part of the story. Knots are the one real fight, since they throw a split off course; if you can, leave enough length to cut the knot off, or saw that part out on the bandsaw rather than riving through it.

Reference

Tools, Materials & the Cut List

The whole build at a glance, the tools you'll reach for, and the sizes to rive your parts to. This is the bench-reference layer — the condensed companion to the story and the steps.

The whole build, in order

  1. Split & rive the log into parts.
  2. Shave arms and legs to four-square; taper the legs; octagonalize all sticks; set aside to dry.
  3. Lay out the seat (lines 1½″ in from each edge).
  4. Drill the outer back sticks through the seat and arm together.
  5. Tenon & fit the back sticks into the arms.
  6. Drill & fit the front legs (90°), then the back legs (raked).
  7. Mark, then drill the arm for each leg; assemble.
  8. Fit the remaining back sticks; drill and fit the comb.
  9. Level the legs, set the recline, and pin / wedge as needed.

Tool kit

Core

  • Froe
  • Mallet / froe club
  • Splitting wedges
  • Sledgehammer
  • Drawknife
  • Marking gauge
  • T-bevel (bevel gauge)
  • Saw
  • Bench chisel
  • Hand brace & bits
  • Dividers
  • Split-head hammer
  • Steel ruler
  • Handplane
  • Pencil & half-pencil (a carpenter's pencil planed to half thickness)
  • Clamps
  • Glue
  • 12″ square

Optional

  • Card scraper
  • Spokeshaves
  • Block plane
  • Adze
  • Inshave / scorp
  • Travisher
  • Coping saw
  • Reamer
  • Trenails / dowels

Cut list — drawknife build

Add ⅛″ to thickness & width of all green parts for shrinkage. Use a dry seat, never green. Arms and crest take a radial face on their wide dimension. Inches.
PartQtyGreen (rough)Dried & dimensioned
Back sticks4+1⅛ × 1⅛ × 301 1⁄16 × 1 1⁄16 × 30
Legs41⅞ × 1⅞ × 301¾ × 1¾ × 30
Arms22¾ × 1¼ × 242½ × 1⅛ × 24
Crest / comb11⅝ × 1¼ × 241½ × 1⅛ × 24
Seat1— (use dry)16 × 24 × 1½

Four or five back sticks is typical; fewer sticks means make them thicker.

The seat is the one part that doesn't come from your log: buy a kiln-dried slab, glue one up from dry boards, or rive and sticker a seat blank a season ahead so it's dry when you need it.


Section 1

Splitting the Log & Riving the Parts

Goal: Straight, long-fibered billets for every part.

Split

  1. Halve the whole log first — the fresh face reveals hidden knots.
  2. Buck into ~36″+ lengths; cut out knots.
  3. Score the end grain pith-to-bark; start a narrow wedge, then a splitting wedge.
  4. Leap-frog wedges down the log; gluts to widen; roll it to free a pinched back.
  5. Quarter each half; pare away the juvenile wood at the pith.
  6. On a big log, keep splitting — eighths, sixteenths, finer. Radial first; switch to tangential once pieces get narrow.

Rive

  1. Set the billet in the brake. Seat the froe centered in the end grain; strike with the club.
  2. Lever the handle to open the split; keep equal mass both sides; lever toward the thick side to correct a wander.
  3. Rive everything oversize (+⅛″). Split arms & crest so the wide face is radial.

This is where a chair begins: not by cutting wood, but by separating it along the lines the tree already grew. Splitting reduces the log to manageable quarters; riving with a froe divides those quarters into the billets from which every part is shaped.

Splitting with sledge and wedge

A scored line runs pith to bark on the end grain; numbered wedges walk down the log as the crack opens.
Score pith-to-bark, start a wedge, then leap-frog wedges along the opening crack.

Start by splitting the whole log in half lengthwise, if you can — a tip from Andy Glenn's build chapter in Backwoods Chairmakers. Beyond halving the stock, the fresh split face does something useful: it reveals any large knots hiding inside, so you can plan around them. With the interior in view, buck the halves into rough part-lengths — about 36″ and up — cutting out knots as you go. Then quarter each half, and pare away the weak, unstable juvenile wood near the pith.

With a big log, quarters are often still too heavy to handle and too fat to rive — so keep going. Split the quarters into eighths, sixteenths, or finer, both so you can actually move the pieces and so they reach a riveable size. These first splits are radial — pith-to-bark, along the rays — which is what gives each part its strong radial face. But once the wedges of wood get narrow, a radial split has little width left to take. At that point switch to splitting tangentially, along a growth ring, to peel a piece down to billet size. You give up the perfectly-radial face on those splits, but it is the only way to break a small wedge down further.

To make a split, follow the procedure Drew Langsner lays out step by step in Country Woodcraft. Begin at the end grain: score a line from the pith out to the bark — if the log already shows a radial check, follow it. Drive a narrow starting wedge into the scored line with the sledge. When the crack begins to open, switch to a standard splitting wedge and drive it until the crack travels along the length. Then comes his technique that makes long logs manageable:

Continue leap-frogging to the end of the log. Use gluts to further open the crack… Gluts must be placed so that they won't intercept interior cross fibers — they will split apart if driven into cross fibers.

Drew Langsner, Country Woodcraft: Then & Now (Lost Art Press, 2020)

In other words: as each wedge frees itself behind the advancing crack, move it ahead of the others, walking the split down the log. Gluts — large wooden wedges — widen the gap behind the steel. If a log splits through on top but stays pinched along the back, Langsner adds, roll it over and drive wedges from the other side. Always try to keep equal mass on either side of the split so it runs straight.

Sledge and wedge, or froe?
Sledge and wedge is the tool for anything bigger than about 4″ × 4″. Once a piece is down near that size, the froe takes over — it gives you the control to rive accurate billets, which brute wedges cannot.

Riving with the froe

Once you have quarters, you switch tools. Splitting opens a log; riving controls a split into a usable part. Langsner's definition is the one to keep in mind — riving is “controlled splitting.” Jennie Alexander draws the distinction by the tools themselves:

Riving is the term we use when employing a different set of tools — the froe, froe club, riving hatchet, cleavers, or hacking knives… For post-and-rung chairmaking, wood is rived into straight, flat planes in the direction of its long fibers.

Jennie Alexander, Make a Chair from a Tree, 3rd ed. (Lost Art Press, 2021)
Side view of a froe blade in a bolt's end grain, held in a riving brake, with the club above and the long handle levering the split open.
Seat the froe in the end grain with the club; lever the handle to open and steer the split.

How to rive

Set your billet in a riving brake — Langsner's “old English woodlands word for any device that holds your material in place while you do something to it.” His favorite is a forked sapling, which “self-binds” when you lever against it. Then, in Alexander's words:

If you are right-handed, hold the handle of the froe in the left hand and the froe club in your right. The froe blade is then centered on the stock. Hold the froe steady and swing the froe club to knock the blade into the end of the billet.

Alexander, Make a Chair from a Tree

With the blade buried, set the club down and use the long froe handle as a lever, twisting and prying to open the split. The single most important habit is Alexander's cardinal rule: riving works best with equal mass on both sides of the froe. When the split starts to wander toward the thinner side, lever the froe handle toward the thicker side to draw it back — Alexander's “tic-tic-tic, and you're back on track.” The tension side of the brake encourages run-out — Langsner's observation — so let the wood guide you and correct early.

Caution
Alexander warns: “An errant blow from a riving tool creates an irreparable plane of weakness down the long fibers below.” Her advice: seat the blade carefully and firmly before you strike. “Good straight, long-fibered stock,” she adds, “is a precious gift and not to be wasted.”

Rive everything oversize, remembering the ⅛″ green allowance. Wide stock — the arms and crest — should be split so their broad faces fall on the ray (radial). Rive a few extra of every part; some will reveal flaws, and the spares become practice stock. If you can't get to your rived parts soon, bag them to slow their drying.

Why rive instead of saw?
A saw cuts straight through fibers regardless of how they run; a split follows them. Riven parts therefore have continuous, unbroken grain from end to end — the source of a stick chair's surprising strength at light weight. It is also simply faster and quieter than milling, and it lets you take the best parts from a log by eye.

Section 2

Shaving the Parts with a Shavehorse & Drawknife

Goal: Read the grain; shave clean, flat faces with the drawknife.

  1. Sit astride the horse, clamp with your feet, pull the drawknife bevel-down in long strokes.
  2. Flip the part end-for-end to reach what was hidden under the jaw.
  3. Shave the way the grain lies — like petting a cat. If it tears or chatters, flip and cut the other way.
  4. Skew the blade (angle it to the stick) and slice (draw it sideways) for a flatter, easier cut.
  5. Crisp off the knife — little or no sanding needed.

With a pile of riven billets, you move to the shavehorse — the foot-clamped bench that frees both hands for the drawknife. This is where most of the build's hours are spent, and where the chair's character is shaped, quite literally, by hand.

The shavehorse and the drawknife

A shavehorse in side view: foot treadle below, pivoting dumbhead jaw gripping the stick, drawknife pulled toward the sitter.
You sit astride the horse, clamp the work with your feet, and draw the knife toward you.

A shavehorse holds a part in a pivoting wooden jaw — the “dumbhead” — that grips harder the harder you press the foot treadle. You sit astride it, the work projecting toward you, and pull the drawknife in long, slicing strokes, bevel down. To reach the section that was hidden under the jaw, simply flip the part end-for-end and carry on. The whole approach has a tidy origin story. Jennie Alexander tells how, prevented from using a lathe at a 1978 demonstration, the answer came from a conversation with Joyce Alexander about preparing lathe stock with a drawknife:

“Why not keep on going and shave the entire chair?”

Joyce Alexander to Jennie Alexander, recounted in Make a Chair from a Tree

That question founded a whole school of shaved, green-wood chairmaking — and it is exactly what we do here.

Grain direction: shave the way the grain lies

The drawknife rewards reading the grain. Think of it — as Drew Langsner taught — like petting a cat. The fibers in a part lie a certain way, like fur; shave the way they lie and they smooth down and the blade slices cleanly. Shave against them — the wrong way up the fur — and they lift, catch, and tear out a chunk, and the cat gets upset. The fibers in a riven part rarely run perfectly parallel to the surface, so the lay can switch partway along a part or across a knot. When a cut starts to tear, you've found a spot where you're going against the grain: stop, flip the part end-for-end, and shave from the other direction.

A second technique makes every cut cleaner. Skew the blade — hold it at an angle to the part's length rather than square across it. Alexander explains why it works:

Skewing the drawknife's blade to the workpiece's long fibers reduces the drawknife's angle of attack. It also increases how much blade surface is resting on the workpiece, helping to create a flat surface.

Alexander, Make a Chair from a Tree
Sharpening the point
A finish, not just a shape.Surfaces left crisp from the drawknife need almost no sanding. Alexander is blunt about it: “Sandpaper days are over. Stock carefully rived in the direction of its long fibers needs little or no abrasive paper.” The faceted, tooled surface is part of the chair's look and feel — and warmer to the touch than sanded wood.

Section 2b

Four-Square, Taper, Octagon

Goal: Tapered legs and octagonal sticks, set aside to dry.

Four-square

  1. Shave the radial face flat & straight; then an adjacent face square to it.
  2. Shave the remaining two faces square and to size.
  3. Work all four faces in rotation; watch for a bell-bottom.

Taper & octagon

  1. Taper each leg to 1″ at the top, starting 20″ down — keep it four-sided.
  2. Octagonalize every stick — equal facets, never bell-bottomed.
  3. Set aside to dry: tenons dry hard; the seat (mortise) can go together a little wetter.

Shaving is not random whittling. Each leg and back stick passes through a disciplined progression — rough billet, to two adjacent flat faces, to a true square — before you taper the legs and finally knock every stick into an octagon. Then it all goes aside to dry.

Four cross-sections side by side: rough billet, two adjacent faces, true square, octagon.
The four stages: rough riven billet, two adjacent faces, four-square, octagon.

Shave to four-square

First face, second face

Start with the radial face. Shave it dead flat and straight — Alexander's test is to hold it against a known flat surface and ask whether its long fibers exit only at the ends of the stick and nowhere along its length. If a fiber runs out the side, the face isn't following the grain. Then shave an adjacent face flat, straight, and square to the first.

Square it

Shave the remaining two faces square, bringing the part down to a true square of the target dimension. Work all four faces in rotation rather than finishing one at a time, and watch for what Alexander calls a “bell-bottom” — the common error where the easier-shaving end gets thinner than the rest.

Technique
Three key moves: with the grain, skew, slice.Shave the way the grain lies — like petting a cat, in the direction the fibers lie so they smooth down; if the blade tears or chatters, you're going against the grain, so flip the part end-for-end and cut the other way. Skew the blade — hold it at an angle to the stick rather than square across it. And slice — draw the knife sideways across its edge as you pull it toward you. Skewing and slicing both lower the effective cutting angle and put more edge on the wood, leaving a flatter, cleaner cut with far less effort.

Taper the legs (while still four-sided)

Before octagonalizing, taper the legs. Taper each leg to 1″ at the top, beginning the taper 20″ down from the top — and keep the leg four-sided while you do it. It is faster to judge and execute a taper on a flat-faced stick than on a round one. (Alexander's observation: a dead-straight taper can read as slightly concave, and therefore weak, to the eye; a hair of convexity looks “just right.” Practice on scrap first.)

A leg drawn full length: full 1¾-inch thickness at the foot, tapering over the top 20 inches to 1 inch.
Taper to 1″ at the top, starting 20″ down — while still four-square.

Octagonalize, then dry

Now turn every stick — legs and back sticks alike — into an octagon by knocking off its four corners. Pencil lines around the squared stick as a guide, then take each corner down in turn, bringing each corner up under the shaving-horse jaw and shaving a little at a time. “Don't go too far on any one corner at first,” Alexander cautions; ultimately, “these facets and the surfaces of the original square will be equal widths.” An octagon of equal facets reads as round to the eye and hand but keeps the crisp, faceted character of hand work.

With the sticks octagonalized, set everything aside to dry. This is the moment the green-wood method pays off — but only if you get the moisture difference the right way around. The tenons must be dry; the seat (the mortised piece) can go together a little wetter. As the seat dries, its holes shrink around the dry tenons and grip them tighter. A tenon fitted wet does the reverse: it shrinks as it dries and the joint loosens. So dry your tenons hard, and never drive a wet tenon into a hole you want to stay tight.

How long is “dry”? For sticks of this size, a few weeks in a dry indoor spot is typically enough. A warm corner near the woodstove — or a simple hot box rigged from a chest and a light bulb — hurries things along. The honest test is a kitchen scale: weigh a part every few days, and when the weight stops dropping, the wood has given up all the moisture it's going to give in that spot.

Remember
Size tenons only when dry.Shape the arms and crest to rough size now and let them dry along with the sticks. Their tenons — and the holes that receive them — are sized only when the wood is dry, so the joints don't loosen as the parts give up their moisture. As Curtis Buchanan puts it in his Democratic Arm Chair drawings, super-dried tenons “should remain so until final assembly.”

Section 3

Laying Out the Seat

Goal: A layout that locates every leg and stick hole.

  1. Seat can be any shape — rectangle is traditional; irregular slabs are fine. Start it dry.
  2. Scribe a line 1½″ in from every edge.
  3. A hole's centerpoint = where two layout lines cross at a corner.
  4. Each hole's angle is sighted along the line parallel to that edge — rake, not splay.

With the sticks drying, turn to the seat. Here is where this chair parts company with the staked chairs in the books: instead of computing compound angles and drilling to a sightline, you scribe a simple grid of layout lines, and those lines will guide every hole and angle as the chair takes shape.

An antique chair in worn original paint.
An antique Jimmy Possum with its original paint — note the broad slab seat and the raked stance. Photo: Lewis Laskin, QVMAG, Launceston, 2022.

Any shape, traditionally a rectangle

The seat can be almost any shape. A rectangle is traditional, but a gentle arc on one or more sides can be pleasing, and irregular off-cuts and slabs are fair game — the Tasmanian makers used whatever wide stock they had on hand, including, in more than one surviving chair, recycled timber from packing cases. Remember the seat is the one part you start dry; a wide green slab will check as it dries.

The layout lines

Five seat shapes — rectangle, trapezoid, arced fronts and backs, oval — each with layout lines 1½ inches in from every edge and holes where the lines cross at the corners.
Scribe a line 1½″ in from each edge; a hole sits where two lines meet at a corner.

Scribe a line 1½″ in from every edge of the seat. These four lines do two jobs at once. First, where two of them cross at a corner is the centerpoint of that corner's hole — the rear corners take the outer back sticks (and later the back legs), the front corners take the front legs. Second — and this is the key to the whole chair — each hole's drilling angle will be read along the layout line that runs parallel to the nearest edge.

The key idea
Rake, not splay.A Jimmy Possum's legs rake — they lean front-to-back — but they do not splay out to the sides. That single fact is what lets you skip the compound-angle math of a staked chair: because there is no sideways lean, every hole's angle lives in one plane, read along one layout line. No resultant, no sightline triangle — just a line and an angle.

Section 4

Drilling the Outer Back Sticks

Goal: Outer-stick holes bored through seat and arm at once.

  1. Draw a centerline down each arm blank.
  2. Clamp seat + arms together, arms UNDER the seat, centerlines on the side layout lines.
  3. Drill the outer back sticks through seat and arm in one pass — rear-corner intersection, 1″ bit.
  4. Sight the rake along the side line: ~9° (upright) to 17° (reclined).
  5. Clamp scrap under the exit face to stop blow-out — every through-bore.

Now you bore the first holes — and you bore the seat and the arms at the same time, so the outer back sticks will pass cleanly through both when the chair goes together. This is the Jimmy Possum's version of stack, or “sandwich,” drilling.

Plan and section views: the arms clamped beneath the seat with their centerlines on the seat's side layout lines, a bit boring through both at once.
Clamp the arms UNDER the seat, centerlines on the side layout lines, and bore both at once.

Line up the arms under the seat

Draw a centerline down the length of each arm blank. (If the blank is wide enough, you can offset this line to place the stick where you want it in the finished arm.) Clamp the seat and the two arms together, with the arms underneath the seat, so that each arm's centerline lines up with the seat's nearest side layout line. The arms are still overlong at this stage, so their exact fore-and-aft position isn't critical yet — what matters is that left and right line up.

Bore through both

Drill the outer back sticks through the seat and through the arm in one pass. The centerpoint is the rear-corner intersection of your layout lines; use a 1″ bit. Sight the rake angle along the side layout line as you bore. Choose the angle for how the chair will be used — anywhere from about 9° for an upright, dining posture to 17° for a relaxed, reclined one. Because you are drilling both parts together, the hole in the seat and the hole in the arm can never fall out of alignment.

Caution
Boring through any part will tear out on the exit face. Clamp a piece of scrap underneath whatever you are drilling, every time, to back the exit hole and prevent blow-out.
Where this comes from
Christopher Schwarz describes the same stack-drilling idea in The American Peasant, crediting it to woodworker Rudy Everts: the mortises in a chair's arm, seat, and back “could be drilled by stacking the parts together and drilling them all at one time. … It works remarkably well.” Here we use it for the outer sticks so the seat and arms agree perfectly.

Section 5

Fitting the Back Sticks & the Legs

Goal: Sticks and legs fitted and drilled — the chair in your hands.

Back sticks → arms

  1. Tenon the tops of the two outer back sticks.
  2. Stand a stick in its seat hole; mark the arm height (8–10″).
  3. Round the stick to pass through a scrap-with-1″-holes up to your line; go slow near the bottom.

Front legs — the scribed shoulder

  1. Drill the front-leg hole 90°, front-corner intersection, 1″+ bit.
  2. Round the top 10″; tap it in to jam; trace the contact line.
  3. Scribe a shoulder one seat-thickness down; saw it lightly, then pare down to the kerf — don't mar the contact line.
  4. Legs are tapered — try each in different holes for the best fit.

Mark the arm

  1. Push the leg up to touch the arm; sight two layout lines and mark — the crossing is your drill point (90°, ⅞″).

Back legs

  1. Foot well back (anti-tip) but clear of the back-stick through-tenon; 20–30°; centerpoint 2″–5½″ from the back-stick hole, along the front-to-back layout line.
  2. Drill & fit like the front — the shoulder line runs at an angle.

From here the chair grows in your hands. You fit the back sticks into the arms, then fit the front and back legs to the seat with a scribed-shoulder joint — reading each angle off the work itself rather than off a number.

Fit the back sticks to the arms

First, cut tenons on the tops of the two outer back sticks. Use whatever you like to make them — a tenon cutter, a dowel cutter, a drawknife, a saw and chisel, a file, or whatever is at hand.

Now fit those sticks into the arms at the height you want the arms to sit — somewhere between 8″ and 10″ above the seat is typical. Here is a reliable way to do it: stand the stick in its seat hole and mark the height you want the bottom of the arm to land. Drill a couple of 1″ holes in a piece of scrap to stand in for the arm, so we don't bruise the mortise too much in fitting. Round the stick down with a drawknife (a spokeshave works too, but a knife is quicker), working until the stick passes through the scrap up to your line. Redraw the line whenever the shaving erases it. Go patiently near the bottom of the stick so you don't overshoot and end up with the arm too low. You can ream the bottom of the mortise a little bit if it helps your fit. With both outer sticks fitted, the upper geometry of the chair is taking shape.

Fitting the front legs: the scribed shoulder

Step panels: a rounded leg jammed in its seat mortise, the contact and shoulder lines marked on it, and the finished tenon seated.
Jam the rounded top, mark the contact and shoulder lines, saw the shoulder lightly, then pare down to it — the contact line stays, as the future top of the tenon.

Drill the front-leg hole first, at 90° to the seat, centered on the front-corner layout intersection, with a 1″-or-larger bit. Then fit the leg:

  1. Round the upper section of the leg until the top 10″ or so can enter the mortise. Tap it in firmly with a hammer so it jams.
  2. Trace the leg where it touches the hole — this contact line is the wood telling you how deep it went. Then scribe a second line one seat-thickness DOWN the leg from the contact, toward the foot. That second line becomes the shoulder.
  3. Remove the leg. Saw lightly into the shoulder line; that kerf becomes the joint's shoulder. Then pare or shave the band between the two lines down to the kerf with a chisel or drawknife, without marring the contact line above it — that line will be the visible top of the tenon when you look down at the finished chair. Seat the leg with the shoulder tight against the seat.
  4. All four legs are tapered, so before you commit, try a leg in different holes — one may seat better than another.

▢ Your photos

Leg-fitting: (a) the leg jammed in the mortise with its contact line traced · (b) the shoulder line scribed one seat-thickness toward the foot · (c) the finished tenon and shoulder, seated.

Why a scribed shoulder?
A round tenon in a round hole has no built-in stop, and end-grain glue alone is weak. The scribed shoulder gives the joint a crisp seat that bears the sitter's weight on long grain, and fitting it to the actual hole — rather than to a number — forgives any wobble in your drilling. Each joint is fitted to its own mortise.
The folk approach
Seat mortise came out wildly off 90°? You have folk-chair options. Ream or waller out the bottom of the hole to swing its angle back toward where you want it, and/or cut the leg tenon at a slight angle to compensate. Angling a round tenon is genuinely tricky to pull off — but hey, it's a folk chair, and it was already wonky.

Mark the arm for the front leg

With the leg fitted to the seat, you locate where it must pass through the arm. Push the leg up through the seat until its top just touches the underside of the arm. If the top lands off the arm's centerline, rotate the leg and see if it improves; if it's still far off, try it in the other front hole. Then sight the position from two directions:

  1. At eye level, sight the center of the leg-tip down the layout line — lined up with the arm and the stick — and mark that line on the top of the arm.
  2. Sight down the adjacent layout line — lined up with the front of the seat — and mark the approximate center of the leg-top onto the arm again.
  3. Where the two marks cross is your drill point. Bore the arm there at 90°, ⅞″ diameter (or whatever thickness you can make a solid tenon at the leg's top).

The back legs

Side view of the whole joint: the outer back stick runs through seat and arm up to the crest; front and back legs rake through the seat, the back leg's foot landing well behind it.
Side view: legs rake through the seat; the back leg's foot lands well behind it.

Assemble the leg, arm, and outer back sticks, then hold a back leg up to the chair to choose its angle and location. You are balancing two needs. You want the foot to land well back so the chair can't tip backward — but you don't want the back stick's through-tenon, where it protrudes below the seat, to collide with the back leg. An angle of 20–30° is good. Put the hole's centerpoint 2″–5½″ from the back-stick hole, along the front-to-back layout line. Where it lands within that zone varies with the angle, the seat thickness, and the leg thickness — so hold the leg up to the chair and verify before you bore.

Drill and fit the back leg the same way as the front, with the round-and-jam, trace, scribe, and pare sequence. The only difference is that the scribed shoulder line will run at an angle rather than square across the leg, because the leg meets the seat at a rake.


Section 6

Drilling the Arm for the Back Leg

Goal: The arm bored for the back leg; the chair assembled.

  1. Confirm arm height at both intersections (12″ square on the seat).
  2. Mark the arm for the back leg; trace where the arm crosses the back stick & front leg.
  3. Remove the arm; rest it on books/shims at those lines; seat the back leg.
  4. Trace the leg onto the arm; take its angle with a bevel gauge.
  5. Drill the arm at that angle — confirm the direction first (a reversed hole = a new arm).

The back leg, like the front, must pass through the arm — but at its raked angle. You find that angle the same way you find everything on this chair: by setting up the actual parts and reading it off them.

Looking up at the underside of an antique chair: the leg tenons pass through the slab seat.
An antique Jimmy Possum seen from below — the legs run straight through the slab seat to meet the arms. Photo: Lewis Laskin, QVMAG, Launceston, 2022.

Mark, then read the angle

First confirm the arm is at its correct height at both intersections, checking with a 12″ square stood flat on the seat. Mark the arm for the back leg the same way you did for the front. Then trace, onto the back stick and the front leg, where the arm crosses them.

Now remove the arm. Stack some books or blocks and shims on the seat and rest the arm on top of them, positioned so that it meets the lines you drew on the back stick and the front leg — this puts the arm exactly where it will live in the finished chair. Seat the back leg. Trace the back leg's shape onto the arm with a half-pencil — a carpenter's pencil planed to half its thickness, a layout trick borrowed from Christopher Schwarz — and take its angle with a bevel gauge. Compare that angle to the angle you actually drilled the back leg at: they may not match exactly, but they should not be wildly off. If they are, something upstream needs a look.

Drill it the right way around

Drill the arm's tenon hole at that bevel angle, on the point you marked along the layout line.

Caution
Bore the hole at the correct angle — not backwards, and not upside down. It is easy, with the arm off the chair and flipped onto a stack of books, to mirror the angle by mistake. Stop and confirm the bevel's direction against the assembled chair before the bit goes in. A reversed hole means a new arm.
The folk method, in one idea
Notice what you did not do: you never looked up a number. You set the real parts in their real positions and copied the angle the chair itself dictated. This is how a tradition without drawings stays alive — the work is its own jig.

Section 7

The Remaining Back Sticks & the Comb

Goal: All the back sticks in, and the comb fitted.

  1. Assemble; rotate the outer sticks to the same angle, take it with a bevel — that's the inner-stick angle.
  2. Space inner sticks: distance between outer centerpoints ÷ (n − 1).
  3. Drill the inner sticks; nudge points to taste; angle a tenon to forgive an off mortise.
  4. Drill the comb at an angle; dry-fit and assemble — it pulls strays into line.

With the outer sticks, arms, and legs established, fill in the rest of the back and cap it with the comb. The chair's shape and posture come together here.

Space and drill the inner sticks

Assemble what you have so far. Rotate the two outer back sticks until they sit at roughly the same angle along the layout line, and take that angle with a bevel gauge — that's the angle for the inner sticks (unless you have a “spicy” plan, like a curved crest, in which case you can vary them deliberately). Space the inner sticks evenly (or don't): divide the distance between the centerpoints of the two outer sticks by (n − 1), where n is the total number of back sticks, and you have the spacing.

This is the moment to nudge things for the look you want — move drill points fore, aft, left, or right to accentuate whatever vibe you're after, and try sticks in different holes to find the best fit for each. If a seat mortise came out a little off, cut that stick's tenon at a slight compensating angle so the stick still lands where it should.

Fit the comb

Set the comb's height by eye and by comfort — hold it against the sticks, sit in what you have so far, and see where it wants to be; there is no magic number. Trim the stick tops to suit, then drill the comb to receive them — at an angle, to match the sticks' lean, with a bit matched to the tenons you'll cut on the stick tops. The mortises can be stopped (blind) or drilled clean through: through-tenons can be wedged and left proud in the JP manner, while stopped holes leave the comb's top edge unbroken. Dry-fit and assemble; glue comes later, at final assembly. The comb is what makes a forgiving chair: as it goes on, it gathers the sticks and pulls any strays into line, which is why you can afford a little wander in the individual stick angles.


Section 8

Final Shaping of the Parts

Goal: Bring every part to its finished profile before glue-up.

  1. Refine the arms & comb with a drawknife (spokeshave or block plane for tricky grain); add any stylistic touches.
  2. Legs: carry the taper further, or cut a double taper — without thinning away the strength.
  3. Middle sticks: match the outer sticks for a uniform fan, or leave them a touch varied.
  4. Surfaces & edges: scrape out tear-out; chamfer or round the seat edges and any sharp arris.

Before glue-up, take everything to its finished shape. Now that the joinery is settled and you can see the whole chair, this is where it stops being a collection of sticks and starts being yours.

Arms and comb

Refine the arms and the comb with a drawknife — round the arms over, ease their ends, and bring the comb to its final profile. If a piece has grumpy, swirling grain that the drawknife wants to tear (riven stock rarely does, but a sawn or figured board can), switch to a spokeshave or a block plane, which take a smaller bite and handle reversing grain more kindly. This is also the place for any stylistic touches or light carving you have in mind — a faceted arm, a shaped comb, a chamfered end.

Legs

The legs already carry the taper you put in earlier; now you can carry it further if you like. Continue the taper farther down the leg for a more delicate line, or cut a double taper — slim toward the foot and again up near the seat, leaving a swell in the middle — for a livelier shape. Keep an eye on strength: don't thin a leg so far it loses its backbone.

The middle sticks

If you want the inner back sticks to read as a uniform set with the outer ones, refine their shape now — match their diameter and taper to the outer sticks so the fan looks intentional. Or leave them a touch varied; on a folk chair that reads as character, not error.

Surfaces and edges

Clean up any tear-out with a card scraper or a spokeshave — a scraper especially loves the spots where the drawknife fought the grain. Then chamfer or round the edges of the seat so they don't bite the backs of a sitter's knees, and ease any other sharp arris your hand will meet. A few passes of detailing here make the difference between a rough chair and a finished one.

The folk approach
None of this has to be uniform or perfect. Tool facets, a slightly heavier arm on one side, a comb that isn't dead-symmetric — these are the fingerprints of a hand-made chair, and they are welcome. Shape to please your own eye.

Section 9

Assembly & Leveling

Goal: The chair glued up, standing true, and reclined to taste.

Glue up

  1. Assemble in build order, gluing as you go.
  2. For legs: seat most of the way, then glue the leg (not the mortise) before driving home.
  3. Wedge a leg-to-arm joint for a positive lock; wedge the comb only if it's loose.

Level

  1. On a dead-flat surface, shim the seat level side to side.
  2. Set the recline by shimming the back (or front) feet; scribe each leg and saw to the line.

Now bring it all together for good, and stand it on its feet so it sits the way you want.

Glue up

Assemble in the order you built the chair, gluing as you go. Any decent wood glue does the job; use hide glue if you'd like the joints to be reversible someday. For the legs, seat each one most of the way, then put the glue on the leg before driving it home — if you put glue down inside the mortise instead, you'll squeeze out a mess and may hydraulic-lock the joint. A wedge across a leg-to-arm joint is a nice touch where you want a positive lock. The comb only needs a wedge if its tenons aren't a tight fit; if they're snug, leave them. Through-tenons can be left proud and stylized — domed or chamfered — or cut flush, as you like.

A rule worth keeping
Build order.Put the chair together in the order you made it: outer back sticks → arm → front leg → back leg → remaining back sticks → comb. To take it apart, reverse it — comb first, sticks last. Forcing parts out of order is how joints crack.
Numbered assembly sequence: outer back sticks, arm, front leg, back leg, then the remaining back sticks.
Assemble — and disassemble — in the order the chair was built.

Level the seat, then set the recline

The assembled chair on a flat surface, feet shimmed level, with a pencil resting on a block to scribe every leg at one height.
Stand the chair on a flat surface, shim level, and scribe each leg to one height.

Stand the assembled chair on a dead-flat surface. First get the seat level side to side, using blocks and shims under the feet until it stops rocking. Then set the front-to-back attitude — the recline — to the sitter's taste by shimming the back (or front) feet. When it sits the way you want, scribe each leg with a block and a half-pencil and saw to the line; the four feet now meet the floor together.

Caution
If you gave the back sticks a high angle, don't recline the seat too far, or the chair gets tippy — the sitter's weight ends up behind the back feet. If it does feel tippy: either take a little off the front legs to stand it up straighter, or drill a hole in the back of the seat and add a fifth leg (an old, honest folk fix — see the Greenhill Six-legged Chair).

Section 10

Pinning, Wedging & Finishing

Goal: The key joints locked, the tenons dressed, and a finish on the chair.

Pin & wedge

  1. Loose leg-to-seat → pin with a trenail through the long-grain side (never end grain).
  2. Leg-to-arm → pin, wedge, or both.
  3. Do NOT pin the arm to the back stick — it must flex.
  4. Wedge the comb only if its tenons aren't already tight.
  5. Wedging: saw the kerf across the grain, ~8° wedge; drive across the grain.

Finish

  1. Pare / saw the proud tenons to final shape; last pass with a scraper.
  2. Finish to taste — oil, wax, milk paint, or a bush coat of paint. Then sit in it.

Lock the joints that need it, dress the proud tenons, and put a finish on the chair. How you do this is partly engineering and partly style.

Pinning and wedging

A well-fitted Jimmy Possum stands largely on friction and the green-wood grip, but a few joints reward a positive lock:

  • If a leg-to-seat joint is loose, pin it with a trenail or dowel driven through the long-grain side of the joint (never through end grain, which would split).
  • Leg-to-arm joints can be pinned, wedged, or both — they carry real load.
  • Do not pin the arm to the back stick. That joint needs to move as the back sticks flex under a sitter.
  • Wedge the comb only if its tenons aren't already a tight fit; otherwise leave it.
  • Every tenon may be cut flush or left proud and stylized — domed, chamfered, or shaped — as you like.
Technique
On wedges.Where you wedge a through-tenon, saw the kerf across the grain of the part being wedged and drive the wedge across that grain, so it tightens the joint instead of splitting the wood. Drew Langsner passes on Dave Sawyer's rule that about 8° is right for a wooden wedge's included angle, with dead-flat faces and a small blunt sub-bevel on the leading edge so it doesn't splinter going in.
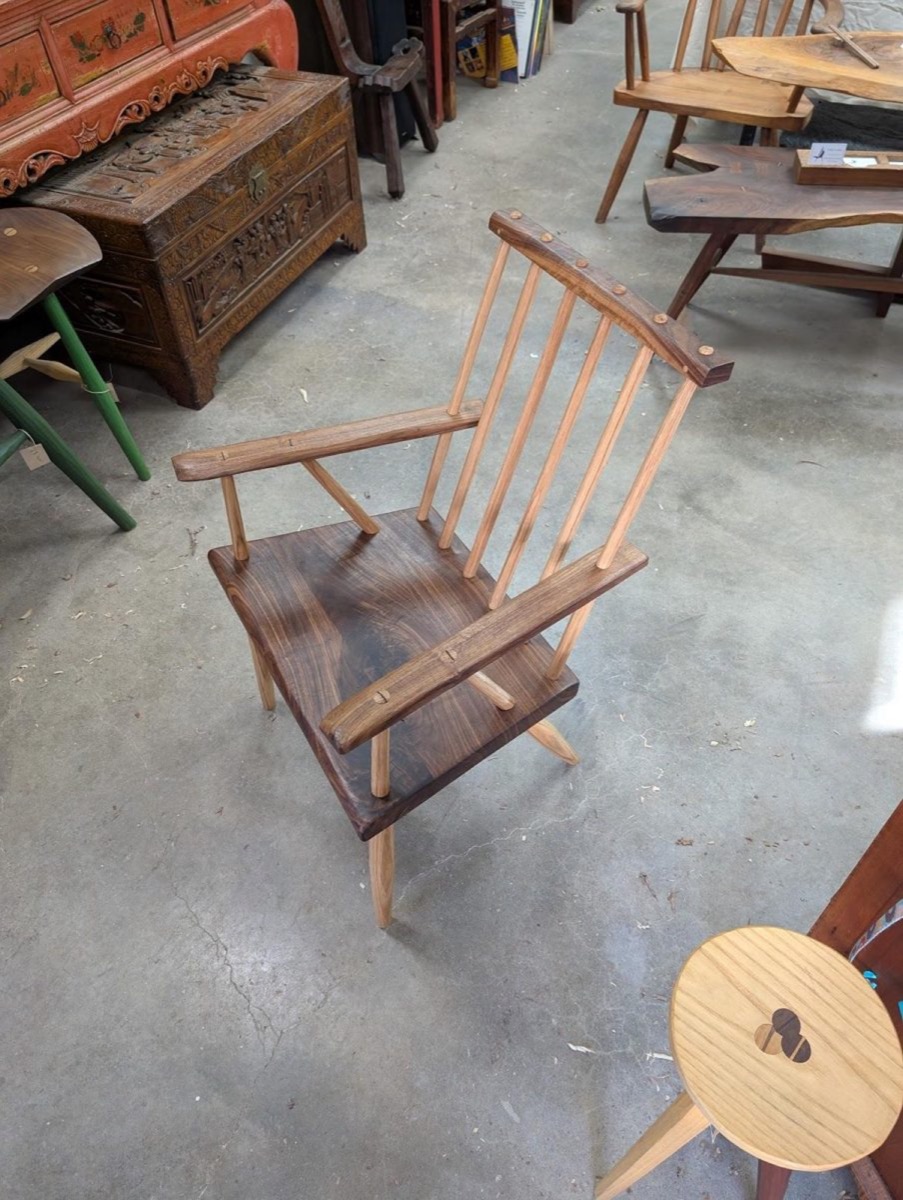
A two-timber chair in pale oak and dark walnut, its wedged tenon tops standing proud.
A white-oak-and-walnut Jimmy Possum of my own — the through-tenons stand proud and wedged on the arms and back sticks. Photo: Lewis Laskin.

Finish

Pare or saw the proud tenon tops to their final look, dome or chamfer them if you left them proud, and give the whole chair a last going-over with a scraper. Then finish to taste — oil, wax, milk paint, or the traditional bush coat of paint (the old chairs were often green or grey). A wiping oil or oil-wax is the simplest and shows off the tooled surfaces; paint hides humbler wood and is every bit as authentic. Then the last step of every chair: sit in it.


Extras

Saddling the Seat

Optional: historic Jimmy Possum chairs were left flat.

  1. Hog out the bulk with an adze or gouge, across the grain.
  2. Refine with an inshave / scorp; smooth with a travisher (with the grain); finish with a scraper.
  3. Keep the deepest point under the sitter — about a thumb's depth.
  4. Dry blank only — a green slab will check and distort.

Saddling means carving a shallow hollow into the seat to cradle the sitter. Historic Jimmy Possum chairs were left flat — the slab seat is authentic and comfortable with the chair's raked stance — so this is entirely optional. But if you'd like the extra comfort, here's how.

Contour plan and section of the seat hollow, deepest aft of center, with the four saddling tools in working order beside it.
Coarse to fine: hog out with an adze or gouge, refine with a scorp, smooth with a travisher, finish with a scraper.

Coarse to fine

Saddling moves through a sequence of tools, each finer than the last. Hog out the bulk of the hollow quickly with an adze or a large gouge, working across the grain where the cutting is easiest. Refine the shape with an inshave or scorp — a curved drawknife for hollows. Smooth the surface with a travisher, a small curved-sole plane made for the job, working with the grain now. Finish with a scraper. Keep the deepest point under where the sitter's weight falls, and don't overdo the depth — about a thumb's depth is plenty.

Caution
Carve a dry seat blank only. A green slab will check and split as it dries, and a saddled green seat will distort. This is why the seat is the one part we start dry.
A note on authenticity
Leaving the seat flat is not a shortcut — it is the tradition. The Tasmanian bush carpenters worked flat slab seats. Saddle yours only if you want to, not because you think you must.


Sources

Sources & Further Reading

This guide draws on a small shelf of primary sources — the books in my library — plus the chairs themselves, seen at the Queen Victoria Museum & Art Gallery. Each is worth your time.

On the Jimmy Possum

  1. Queen Victoria Museum & Art Gallery (2022). “Jimmy Possum: An Unbroken Tradition.” Launceston, Tasmania. Curated with research by Dr. Mike Epworth and Bronwyn Harm. — The exhibition behind this guide's photographs and much of its history, including the Greenhill journal and the Meander Valley makers.
  2. McWilliams, M., Dufour, M., Sharp, J., & Thorp, A. (1978). Chairs made by Bush Carpenters in Tasmania, during the 19th and early 20th Centuries. Tasmanian School of Art, Mt Nelson. — The foundational field research on Jimmy Possum and the Larcombe-family chairs of the Deloraine district.

Green-wood chairmaking technique

  1. Alexander, J. (2021). Make a Chair from a Tree, 3rd ed. Lost Art Press. — The classic on green-wood, hand-shaved chairmaking; riving, drawknife technique, and the rough-to-octagon progression.
  2. Langsner, D. (2020). Country Woodcraft: Then & Now. Lost Art Press. — The froe, riving brakes, splitting logs, and wedges (the leg-as-wedge and the 8° wedge rule).
  3. Glenn, A. D. (2023). Backwoods Chairmakers. Lost Art Press. (Foreword by Curtis Buchanan.) — Portraits of the Appalachian post-and-rung tradition; the folk-chair framing, the green-wood joinery principle, and the split-the-whole-log-first tip in Section 1.
  4. Schwarz, C. (2024). The American Peasant. Lost Art Press. — The “stack” (sandwich) drilling method used here for the outer back sticks, a technique Schwarz developed with Rudy Everts.
  5. Schwarz, C. The Stick Chair Book, 2nd rev. ed. (2025). Lost Art Press. — Background on boring seat mortises by hand, the “half-pencil” scribing trick, and general guidance on back-lean angles for dining vs. lounging; note that the Jimmy Possum's rake-only geometry sidesteps the staked chair's compound sightlines.
  6. Buchanan, C., & Lefkowitz, J. Democratic Arm Chair construction drawings (2023–24). curtisbuchananchairmaker.com. — A model build “recipe” and the convention of super-drying tenons before final assembly.

Online

  1. Laskin, L. (2023). “The Stick Chair from Down Under.” Lost Art Press blog — the author's account of meeting these chairs in Tasmania. blog.lostartpress.com
  2. Schwarz, C. (2022). “Meeting Jimmy Possum.” christopherschwarz.substack.com
  3. Epworth, M. (2020). “The Legend of the Jimmy Possum Chair.” Mortise & Tenon Magazine, Issue 8. mortiseandtenonmag.com
Text, diagrams and photographs © 2026 Lewis Laskin except where noted · Quoted passages and archival images remain © their respective owners, reproduced for education and commentary.